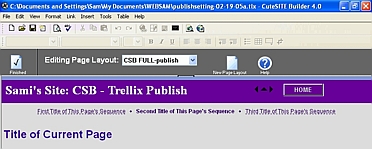
Sami's Site: CSB - Trellix Publish
|
Switching from frames to no-frames (frames/noframes)
It takes only the unchecking of a box in the Publishing Options section to change your pages from a framed page to a non-framed page. Simple. Easy and Fast.
BUT you may find that you encounter a strange effect when you change the formatting.
Removing frames often shows things in your settings and borders that you did not realize you had in there and usually there are simple things to tweak pages to resolve.
Top Border Expands: The most obvious and the easiest to fix is the top border expands without any changes being made to it. Take a look at these captured images that demonstrate the problem:
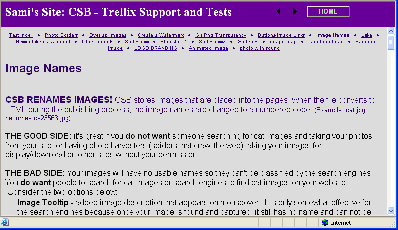
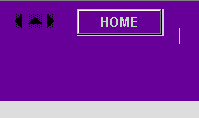
Page published with FRAMES - Top purple border is 50 pixels high
|
 |
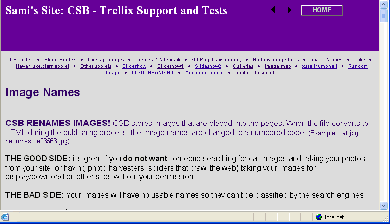
Page published without FRAMES - Top purple border expands
|
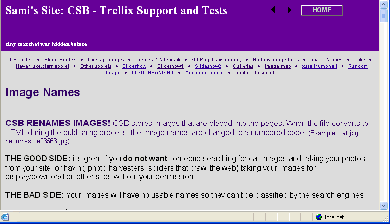
This page has hidden spaces and returns:
 This page had hidden text, spaces and returns:
 |
This OFTEN happens. And it is caused by characters, spaces, returns, and even text that you did not know you had in the top border.
When using frames, you don't see the problem. It is a hidden issue because the border properties box is set to have 50 pixels high and the box to turn off scrollbars is checked. When the page publishes in frames, the browser follows that instruction and shows a 50 pixel top and no scrollbar. If the box is unchecked for scrollbars and republish with frames, usually the top border will generate a scrollbar in frames because of the extra characters or text or even font size change and paragraph settings (spacing before or after the text).
But when publishing without frames, the top border is attached to the page body. The TRUE full height of the border, including extra returns and text and spaces will be revealed on the page. (I found it shocking the first time I saw it and was really scared my site was permanently damaged)
THE FIX follows the same method, but is applied two different ways.
Since the borders and other page properties can be edited in the PAGE LAYOUT or through the individual PAGE PROPERTIES, it may be necessary to check both ways to determine where the extra characters are.
MAKE A BACKUP COPY OF THE FILE BEFORE YOU BEGIN IN CASE YOU DON"T LIKE THE RESULT
|
Open the page that has your problem in the design window. Then start at the purple arrows  below. Follow instructions but stop at the second set of purple arrows
  !
!
Choose FORMAT on the toolbar at the top of the design window.
Choose EDIT PAGE LAYOUT, a new window opens:
While in the PAGE LAYOUT page, you can change border colors, width, text, pictures, and backgrounds, add, change, or remove text, pictures, tables, links, fields, even add HTML and other code.
 CHANGES TO THE PAGE LAYOUT CAN NOT BE UNDONE. If not sure you will like the result you can either make a backup copy of the file or click the NEW PAGE LAYOUT button to create something new and the old version will remain intact.
|
Follow the instructions below
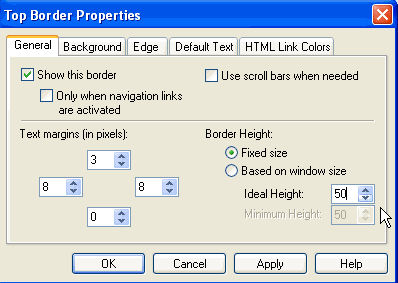
Right click on the top border
Choose Properties
Change the Fixed size of the border to a larger size, Apply then OK.
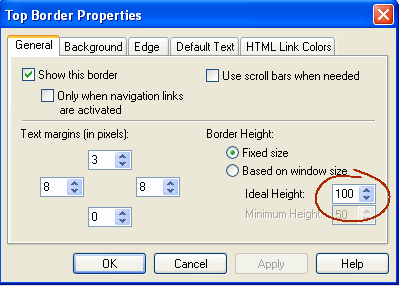
This image shows the height was changed to 100 pixels doubling the normal size.
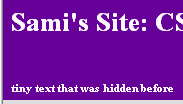 |
Hidden text is revealed.
This text can be removed by placing your cursor to the right of the last text and using your backspace to remove the text, returns and spaces. Clean until your cursor is to the right of the LAST item in the border (text, image, table). (If you can not remove this text on an individual page, then open your PAGE LAYOUT area and try again)
|
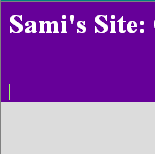 |
Or you may see nothing unusual.
Test the border.
Can you place your cursor below the text you knew about as in this image? If so, you have extra spaces or returns which expand your border. Use your DELETE and BACKSPACE buttons to clear out the extra stuff and make sure your cursor ends up
(If you can not remove this text on an individual page, then open your PAGE LAYOUT area and try again)
|
 |
The cleaned top border should now have the cursor to the right of the LAST item in border. (The last item on the sample is the table that holds my text, navigation arrows and rollover button.)
The cursor should NOT be below the last item as it will add more to the height of the border.
|
Right click on the top border
Choose Properties
Change the Fixed size of the border back to your normal border height, Apply then OK.
This image shows the height was changed back to original size.
Make the changes to the PAGE LAYOUT
Click Finish. The Page Layout Editor closes
Click your page on the map to select it. Selected pages will have a surrounding dotted box.
For many pages: either hold down CTRL key while clicking the page, or draw a rectangle around several pages. hoosing several pages) on the map you want the PAGE LAYOUT to work on.
On the menu bar, choose Format > Apply Page Layout. The Apply Page Layout window opens
Select the layout you just modified from the list
Apply page layout to, choose All selected pages if more than one page, current page if only one page to be changed
Click OK. The Apply Page Layout window closes, and all the selected pages change to the new layout.
Try publishing!